Category Archives: kefir

Orange Cream Kefir

Inspired by Cultured Food Life’s post about second fermentation of milk kefir, I made this yummy breakfast.  I’m normally not a huge fan of kefir but a second fermentation was all it needed to push me into the fan category.
The second fermentation takes the edge off the kefir giving it a more pleasant taste and you can impart other flavors in it like we do with water kefir and kombucha. It also increases the B vitamins.  Yay for B vitamins!  My first experiment is with orange zest and vanilla extract.

Orange Cream Kefir

  • 1 quart raw milk
  • kefir grains
  • zest from 1 orange
  • 2 tsp vanilla extract
Add kefir grains to your milk and let culture at room temp for about 24 hours.  Strain kefir grains.  
Add orange zest and vanilla, mix well and let set for about 8 hrs to a full day.  At this point the kefir may have separated. Just give it a good shake.  
I’m thinking this would be equally good in kombucha and water kefir.  I’ll let you know!

ETA: I made some orange cream water kefir this week and cracked open a bottle this afternoon.  Yum!

Part of Fat Tuesday, Traditional Tuesday…


Counter Top Yogurts

I was talking with my mother-in-law (who is eager to make some diet changes, yay!) about yogurt and probiotics and while I say making yogurt is easy, I have to admit for someone completely new to traditional cooking, it can be quite daunting.  But that doesn’t mean you shouldn’t try it!  I’m going to show you how to make the simplest of yogurts, no special equipment required.

Yogurt is what happens when you add certain beneficial bacteria to milk and allow it to culture for a few hours to a day.  The longer the fermentation period, the more sour it is.  The bacteria eat the lactose so if left to culture long enough, all the lactose will be spent and those who are lactose intolerant should be able to enjoy yogurt without later regret.  The yogurt that most of us is familiar from the store contains lactobacillius acidophilus and bifidobacteria and is cultured at 110F for just a few hours.  But did you know there are many different kinds of yogurt?  A yogurt from a different part of the world may contain different strains of bacteria and some do not need the higher temps of the store bought yogurt we are all familiar with.

I use 3 different types of counter top yogurts: Villi, piima, and kefir.

Viili and Piima
Viili and piima (yes, there are 2 i’s) originated in Scandinavia and cultures between 70-78F.  they have thinner consistency that what you may be familiar with but it lends itself very nicely to smoothies and has a nice mild taste.  I actually prefer their taste over store bought yogurt.

Kiddo loves it with just a few drops of stevia to sweeten.  Now that’s a milk mustache!

They are actually quite simple to make.  No joke.  To make either viili or piima, you simply gently mix in 1/4 cup of starter per 1 quart of milk, loosely cover and leave it alone for 12-24 hours.  24 hours will ensure all the lactose is eaten up.  If you are using raw milk, you’ll want to maintain a special starter about once a week.  I just warm up 1 quart of milk to 160F and then let it cool to room temperature and add 1/4 cup of starter from a previous batch.  Raw milk contains bacteria and while it is good bacteria, it will contaminate the yogurt culture and you might get some funky results if you don’t maintain a pure starter.  

You can purchase viili and piima (and many other different yogurts) at Cultures for Health.

Kefir
Now kefir is a bit different than other yogurts in that it is these gelatinous masses (grains) that create the kefir yogurt that is mildly effervescent.  Milk soda?  It is a symbiotic matrix of beneficial yeasts and bacteria.  It is much more diverse than yogurt and contains incredible amount of different yeasts and bacterial.  All good for a healthy gut.  You can find a list of bacteria and yeasts that can be found in kefir here: http://www.culturesforhealth.com/milk-kefir-grains-composition-bacteria-yeast

My favorite thing about kefir is not only the complexity of it but the simplicity of making it.  Just drop the grains in a quart of milk and it does all the work.  Come back the next day and you have kefir.  Strain the kefir out (I just fish them out with a spoon and rinse them off gently) and add to a new quart of milk.  My family goes through a quart a day easily but if you don’t need a quart every day, you can let your kefir rest by placing it in cold water or milk and refrigerating it for about a week.  If you need to take a break from kefir, you can freeze it for a few months just fine.

Kefir also multiplies so you can either just eat the extra or you can give some to a friend.  To get your own kefir grains, if you don’t have a friend with some, Cultures for Health also carries kefir grains.

Make your own sour cream!
All three of these cultures also make the best sour cream.  You’ll never need to buy sour cream again!  Just add 1/4 cup piima, viili or kefir grains per quart (or 1 tbsp per cup) and let it set 12-24 hours. Be sure to use farm fresh cream if it’s available.  If not, be sure to NOT use ultra-pasteurized cream.  Only fresh or pasteurized works well.
Oooh, you must try making butter out of this cultured cream.  Super yumminess!  Hmm, I may have to write a whole separate post for this goodie.

How to use viili, piima and kefir?


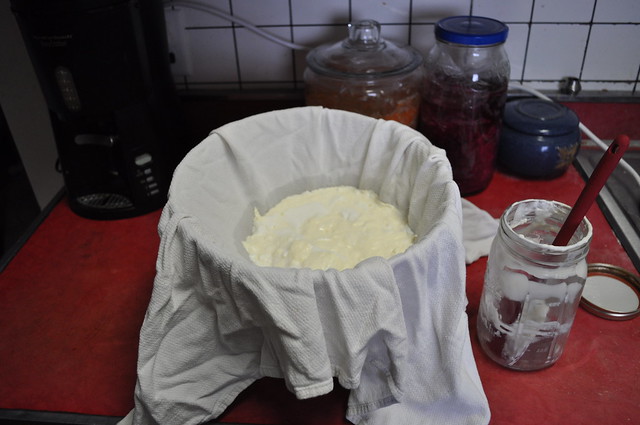
Our favorite way to eat yogurt is to just add a few drops of stevia or raw honey to sweeten and maybe a few drops of vanilla or orange extract.  You can make a quick and easy smoothie by blending in some fresh juice (like Naked Juice) or frozen berries.  I like the ratio of 2 parts yogurt, 1 part juice.  It also gets used in place of buttermilk, yogurt and sour cream in recipes.  Drip it for yogurt cheese, cream cheese or to use in Pumpkin Cheesecake.

*Just a note.  I do have an affiliation with Cultures for Health but have been recommending them long before the affiliation.  I get all of my cultures from here and highly recommend them. I’d never recommend anything that I didn’t stand behind.


Pumpkin Cheesecake with Kefir

This simple recipe uses gelatin to set it rather than cooking.  You don’t want to cook all those good buggies in your kefir (or yogurt).  I love when tasty meets healthy.

Pumpkin Cheesecake with Nut Crust

  • 1 pkg unflavored gelatin
  • 1/2 cup water, divided
  • About 1 1/2 to 2 quarts of kefir or yogurt reduced to 2 cups kefir cheese (you can use 16 oz cream cheese), softened
  • 3/4 cup rapadura sugar (unprocessed sugar or honey)
  • juice 1 lemon (save zest for crust)
  • 1/2 cup fresh cream
  • 16 oz pumpkin (preferably fresh but canned will do)
  • 1 tsp cinnamon
  • 1/2 tsp ginger
  • 1/2 tsp nutmeg
  • pinch of salt

Dissolve gelatin in 1/4 cup cold water for about 5 mins.  Add 1/4 cup hot water and stir to dissolve.
In a stand mixer with a paddle, mix kefir until smooth.  Add sugar, lemon juice, cream, pumpkin, spices and salt. Whip for about 2 mins on medium speed.  Mix in gelatin until well blended.

Nut Crust

  • 1 1/2 cups almond flour
  • 5 tbsp melted butter (or coconut oil)
  • 2 tbsp rapadura sugar
Mix sugar into flour.  Mix butter until well blended.  Press into a deep pie plate.
Pour cheesecake mixture into the nut crust and chill overnight.

Labneh Kefir Cheese and Fresh Whey

Labneh kefir cheese is simply drained kefir.  This is how I get most of my fresh whey for all of my fermented fun experiments.  I like the idea that all the probiotic yumminess of kefir will be part of my fermented veggies.
First line a colander with a thin towel.  I find a flat cloth diaper works excellent!  Place colander over a bowl and dump in your kefir.  Here I used a quart of kefir.  Let drip for about 8 hours or until kefir is the consistency of cream cheese.
Reserve the liquid whey.  It’s highly nutritious and can be used in lactofermentation, soaking grains/nuts/seeds or in baking.
Stay tuned for some recipes using Labneh.  I have a few ideas in mind…

Ranch Dressing

You ask, “Why make Ranch dressing when I can just buy a bottle at the store?”
Have you ever read the ingredients label on Ranch dressing. Eek! Nasty and no thank you.

My childhood favorite dipping sauce, Hidden Valley Ranch contains the following:

Soybean Oil, Water, Egg Yolk, Sugar, Salt, Cultured Nonfat Buttermilk, Natural Flavors (Soy), Spices. Less than 1% of Dried Garlic, Dried Onion, Vinegar, Phosphoric Acid, Xanthan Gum, Modified Food Starch, Monosodium Glutamate, Artificial Flavors, Disodium Phosphate, Sorbic Acid and Calcium Disodium EDTA as Preservatives, Disodium Inosinate and Disodium Guanylate.

Yuck.

Honestly, making your own is really not that hard. The hardest part is cleaning the blender/food processor when your done. But homemade Ranch dressing tastes so good, it’s worth it. Psst, it’s cheaper too!
ETA:  To make clean up a breeze, simply use a wide mouth mason jar and an immersion blender.

You’ll need the following:

  • 1 egg yolk
  • 1 tbsp apple cider vinegar
  • 1/4 kefir, piima, buttermilk, yogurt or sour cream (sour cream or yogurt makes a great thick dipping sauce) most any cultured milk product will do
  • 2 scallions, chopped
  • 1 small shallot, chopped
  • 1 garlic clove
  • 1 tbsp dill, fresh
  • 1 tbsp parsley, fresh
  • 1/8 tsp salt
  • 1/2 cup extra virgin olive oil

Place everything in the blender/food processor except the olive oil. Whirl around until very well blended. While the blender is still on, slowly drizzle the olive oil in a thin stream. The oil will emulsify it to a yummy creation.

Another ETA: I made this recently and added a roasted red pepper.  Delicious!  It gave the dressing a nice red tinge.  Or add 1-2 tsp chipotle chili powder for a Southwestern kick.


Post Run Egg Nog

Mmm, egg nog, mmm…
Did you know egg nog can actually be good for you? Not the sugar/artificial everything laden stuff in the supermarket but the yummy homemade goodness using fresh from the farm ingredients. The only thing I bought from the store on the ingredients list are the spices. Even the the vanilla extract is homemade!
Full of good proteins, good fats and good simple sugars, this is my new post-workout food of choice. It’s also full of raw milk and eggs so according to the FDA, I’ll die from this or at least get really sick. It’s a wonder mankind has survived all these years without their wise advice *hint of sarcasm*. I won’t go into the safety of raw milk and eggs, you can find it yourself easy enough. Just make sure you get your milk and eggs from a good farm. Raw milk from your local commercial dairy actually might kill you. There is a BIG difference between commercial dairies and organic/raw dairies. Big!
ETA: If you want to read a good articles about the safety of raw milk, here is one http://www.boston.com/bostonglobe/magazine/articles/2008/03/23/got_raw_milk/?page=full
DSC_0007-2
Good-for-you Egg Nog

  • 1 cup fresh raw milk (yogurt or kefir taste yummy too and make it GAPS legal)
  • 2 fresh eggs from pasture fed chickens (high in vitamin D and omega 3’s)
  • 1/2 tsp honey
  • dash of cinnamon and nutmeg
  • few drops of vanilla extract

Whirl everything together in a blender (I use my submersion blender) and drink up!
*From Ramiel Nagel’s book “Cure Tooth Decay.”


Design a site like this with WordPress.com
Get started